Showing posts with label Game Development. Show all posts
Game Development: Unreal Engine 4 Introduction
Introduction
As Epic Games have recently made
Unreal Engine 4 freely available to the public, I have changed my focus from
learning lower level engine and game programming to learning how to build game
functionality using an existing set of tools. The Unreal Engine is a
fully-featured industry standard game engine, including a map editor, blueprint
scripting, A.I system, physics system, lighting, material and shader pipelines,
character animation, cinematics toolset, and visual effects and particle
systems, and I hope to explore as many of these features as possible.

The knowledge I have gained in my
initial learning of game programming with MonoGame is a great foundation that
gives me a deeper understanding of the functionality I am using in Unreal
Engine. For example, while I might not know the exact steps the shader pipeline
is taking as it builds lighting and materials, I have some concept of how it
builds light, shadow and reflection maps and combines them with the output of
material shaders to render the final scene. I was pleased to see that the input handling class I had built
in MonoGame had similarities with UE’s system of mapping inputs to actions and
using the actions’ events to trigger game logic.
Blueprints
Game functionality in UE4 is
built using the Blueprint visual scripting system, which is used to create game
objects and content with interactivity and logic. From a developer’s point of
view, a blueprint is equivalent to a class, one that is designed through graphical
interfaces and can be instantiated in the game world including 3D models,
materials, audio, lighting and behaviours. As with any class in the world of
programming, a Blueprint class can contain variables, functions, interfaces and
enumerations. The Blueprint Editor contains 3 primary tabs: The Viewport, which
allows us to create the visible part of the Blueprint object, the Construction
Script, which fires whenever a blueprint object is instantiated or modified,
and the Event Graph, in which the blueprint's logic is defined.
For my first Blueprint, my aim
was to create a set of sliding doors. I started with the First-Person template
included in UE, which includes a player character and controls for camera and
character movement. I built the 3D model for my door in Blender, unwrapped the
UVs for texturing and applied basic materials, and exported it as an .fbx file.
Importing this into UE, I scaled the mesh uniformly by 50 using the import tool, as Blender
uses different units to Unreal. Having UV mapped the mesh, I was able to
replace the imported materials with some better-looking materials included in
the project's starter content.

In the Viewport of my new blueprint, I started by added a Scene component as
the root of the object, with a pair of door meshes as its children. By using
the Scene root, I can scale, rotate and translate each door, as well as any
other component I add to the blueprint, independently of each other, as they
are all on the same level of the blueprint’s object hierarchy. Any component
that is the child of another component will have its parent’s transformations
applied to it.

Next, I added two box collision components, which are used to provide
interactivity with the blueprint. The first, larger box, the ActivateBox, which
extends beyond either side of the doors, is used to detect if the player is
nearby. I modified the volume's collision settings to ignore all objects except
for overlaps with a pawn (i.e. the player):

The TargetBox, which bounds both
doors, is used to trigger the opening and closing of the doors. All collisions
are disabled for this box, as the interaction functionality will be handled separately
in the blueprint's event graph.
To allow the player interact with
the sliding doors when it is nearby (i.e. overlapping with the ActivateBox), I
created the Interact interface, which has a single OnInteract function. I then
modified the player character blueprint to call this function for all objects
it overlaps with when the Interact action is performed, allowing the player to
interact with multiple overlapping objects at the same time:

In the Sliding Doors blueprint’s
event graph, I use the TargetBox to determine if the blueprint’s functionality
should be fired when it receives an OnInteract event. The blueprint performs a
ray cast from the centre of the player’s view along its forward vector and
checks if the trace intersects the TargetBox. If it does, the doors are toggled
open or closed:

I keep track of the current state
of the doors in the DoorIsClosed Boolean, using a Branch node to open the doors
if closed, and vice versa. The movement of the doors is handled by a Timeline,
which returns a changing X-value over time. I add this value to the initial
location of the door (which I store when the game starts) and use the result to
set its relative location. If the door is open, the timeline is played in
reverse to return it to its original location. Setting its relative location
means it is using the blueprint’s local coordinate system rather than the world
coordinate system, allowing the doors to have the same movement regardless of
what rotation, location or scale each instantiation of the blueprint has.


| Door position Timeline |
Finally, when the player leaves
the bounds of the ActivateBox, the OnEndOverlap event fires, triggering a delay
that automatically closes the doors after a few seconds:

Game Development: 5. Rendering and Shaders
Geometry
In order to start building a
playable game, we’re going to need to be able to see the game world and the
objects it contains. For 2D games, this involves going through the game’s state
and drawing the Texture2D sprites of the components in it at the specified X, Y
coordinates. Adding the extra dimension, we move into the world of vertices,
polygons and textured faces. I’ve done some work with primitives, creating
vertices, joining them into faces and building them in to simple scene geometry.
MonoGame provides multiple vertex
primitive types and ways of building collections of them into scene geometry. I
use the VertexPositionNormalTexture structure to
build geometry with vertices that store position, normal, and texture
coordinate data. I wrapped this in my own struct that also stores a reference
to the texture to be applied to the vertex:
  public struct TextureVertex
    {
        public VertexPositionNormalTexture vertex;
        public TextureName texture;

        public TextureVertex(VertexPositionNormalTexture vert, TextureName tex)
        {
            vertex = vert;
            texture = tex;
        }

    }
I created a geometry services
class to perform the task of building vertices into geometry. As every 3D
object is built from triangular polygons, this class builds four-sided Quad
faces as a pair of triangle polygons from four input vertices:
public static List<TextureVertex> BuildQuad(Vector3[] orderedVertices, bool splitFromTopLeft/*Determines whether quad is split into tris from top left corner or top right*/, Vector3 normal, TextureName topTriTexture, TextureName bottomTriTexture)
        {
            //Quad - orderedVertices:
            // 0-----1
            // |     |
            // |     |
            // 3-----2
            List<TextureVertex> result = new List<TextureVertex>();
            Vector2[] textureCoordinatesTopTriangle = TextureAtlas.GetInstance().GetTextureCoordinates(topTriTexture);
            Vector2[] textureCoordinatesBottomTriangle = TextureAtlas.GetInstance().GetTextureCoordinates(bottomTriTexture);

            if (orderedVertices.Length == 4)//Must have 4 vertices for a quad
            {
                //Determine if quad is split 0-2 (top left) of 1-3 (top right)
                if (splitFromTopLeft)
                {
                    for (int i = 0; i <= 2; i++)//Top right triangle
                    {
                        result.Add(new TextureVertex(new VertexPositionNormalTexture(orderedVertices[i], normal, textureCoordinatesTopTriangle[i]), topTriTexture));
                    }
                    //Bottom left triangle
                    result.Add(new TextureVertex(new VertexPositionNormalTexture(orderedVertices[2], normal, textureCoordinatesBottomTriangle[2]), bottomTriTexture));
                    result.Add(new TextureVertex(new VertexPositionNormalTexture(orderedVertices[3], normal, textureCoordinatesBottomTriangle[3]), bottomTriTexture));
                    result.Add(new TextureVertex(new VertexPositionNormalTexture(orderedVertices[0], normal, textureCoordinatesBottomTriangle[0]), bottomTriTexture));
                }
                else
                {
                    //Top Left triangle
                    result.Add(new TextureVertex(new VertexPositionNormalTexture(orderedVertices[3], normal, textureCoordinatesTopTriangle[3]), topTriTexture));
                    result.Add(new TextureVertex(new VertexPositionNormalTexture(orderedVertices[0], normal, textureCoordinatesTopTriangle[0]), topTriTexture));
                    result.Add(new TextureVertex(new VertexPositionNormalTexture(orderedVertices[1], normal, textureCoordinatesTopTriangle[1]), topTriTexture));

                    //Bottom right triangle
                    for (int i = 1; i <= 3; i++)
                    {
                        result.Add(new TextureVertex(new VertexPositionNormalTexture(orderedVertices[i], normal, textureCoordinatesBottomTriangle[i]), bottomTriTexture));
                    }
                }
            }

            return result;
        }
Using the geometry services class
to build faces from a set of vertices, I can create 3D objects in my scene. In
my Cube geometry class, I use this service to create the 6 faces of the cube
from an array of 4 top and 4 bottom vertex coordinates, i.e.:
            //Create Top Face
                    Vector3[] quad = { topVertices[1], topVertices[2], topVertices[3], topVertices[0] };
                   faces.AddRange(GeometryServices.BuildQuad(quad, true, normalTop,BlockTextures[Direction.Up], BlockTextures[Direction.Up]));

With my Cube geometry built from
a set of faces, I can prepare my object for rendering by building the vertex and
index buffers. Using vertex and index buffers, we can reduce the amount of data
sent to the graphics card by only storing each unique vertex once in the vertex
buffer, then referencing the index of the vertex for each polygon it appears in
in the index buffer. For example, a quad face is made of two triangular
polygons. If the overlapping corners of these polygons use the same texture
coordinates, then there is no need to pass the vertices to the graphics card
twice. With the vertex and index buffers set, we can render the geometry in the
scene:
        public void Render(GraphicsDevice graphicsDevice)
        {
            graphicsDevice.SetVertexBuffer(VertexBuffer);
            graphicsDevice.Indices = IndexBuffer;
            if (Vertices.Length > 0)
            {
                graphicsDevice.DrawIndexedPrimitives(PrimitiveType.TriangleList, 0, 0, Vertices.Length, 0, Indices.Length / 3);
            }
        }
Using my Cube object, I did some
experimenting with voxel-based terrain generation and was able to add some
optimizations to my scene by only adding Cube faces to the vertex buffer if
they were exposed i.e. not blocked by an adjacent Cube. I implemented a
multi-level approach to building the buffers: first for an individual cube,
using the results to build the buffers for a terrain Chunk, and finally for the
whole scene. The buffers were rebuilt whenever a Cube was added or removed from
the scene. I tested this by generating some terrain using a Perlin Noise
generator:


Shaders
With the processes to build some
scene geometry in place, the next step is to instruct the graphics card how to
interpret the data and draw the scene. To do this, we use shaders. Shaders are
programmable instruction sets used as part of the graphics pipeline to
determine how the data from the game is interpreted and displayed by the GPU,
and usually comprise of two core components: a vertex shader, and a
pixel/fragment shader. In the rendering pipeline, the CPU runs a Draw call,
sending scene geometry and data along with shaders to the GPU. The vertex
shader receives a stream of vertices from the geometry, interprets and modifies
them (e.g. transforming model coordinates to world coordinates using the Camera’s
World, View and Projection matrices). The triangle faces of the output geometry
are rasterized into pixels (“fragments”), and passed to the pixel shader, which
uses the pixel data to determine how each pixel on screen should be coloured.
As MonoGame includes SharpDX, a
DirectX API, for rendering, High-Level Shading Language (HLSL) is used to write
shaders. For my first attempt at building a rendering workflow using shaders, I
have been looking at creating a pre-lighting renderer. The tutorials I followed
can be found here: http://rbwhitaker.wikidot.com/hlsl-tutorials,
http://www.catalinzima.com/xna/tutorials/deferred-rendering-in-xna/,
https://www.packtpub.com/books/content/advanced-lighting-3d-graphics-xna-game-studio-40.
This approach splits lighting
calculations from the rendering of the rest of the scene, performing lighting
calculations only on visible pixels the light affects. The technique performs
multiple passes of the scene, the first extracting the data necessary to do
lighting calculations, which can be used in subsequent passes to render the
final scene.
First, the Renderer creates a
geometry buffer which stores the depth and normal data of the geometry in the
scene. This data is stored as colour information in Texture2D objects. Rather
than rendering to the screen, the GPU is instructed to render to Texture2Ds:
graphicsDevice.SetRenderTargets(_normalTarget, _depthTarget);
Once the render targets are set,
the shader parameters (World, View and Projection matrices) are set, and the scene
(i.e. all objects in the GameState that implement the IRenderable
interface is rendered using the depthNormal shader:
ShaderManager.GetInstance().DepthNormal.Parameters["World"].SetValue(Matrix.CreateTranslation(0, 0, 0));

ShaderManager.GetInstance().DepthNormal.Parameters["View"].SetValue(activeCamera.CameraViewMatrix);

ShaderManager.GetInstance().DepthNormal.Parameters["Projection"].SetValue(activeCamera.CameraProjectionMatrix);
//HLSL Shader:
float4x4 World;
float4x4 View;
float4x4 Projection;

struct VertexShaderInput
{
 float4 Position : SV_POSITION;
 float3 Normal : NORMAL0;
};

struct VertexShaderOutput
{
 float4 Position : SV_POSITION;
 float2 Depth : TEXCOORD0;
 float3 Normal : TEXCOORD1;
};

VertexShaderOutput VertexShaderFunction(VertexShaderInput input)
{
 VertexShaderOutput output;

 float4x4 viewProjection = mul(View, Projection);
  float4x4 worldViewProjection = mul(World, viewProjection);

  output.Position = mul(input.Position, worldViewProjection);
 output.Normal = mul(input.Normal, World);

 // Position's z and w components correspond to the distance
 // from camera and distance of the far plane respectively
 output.Depth.xy = output.Position.zw;

 return output;
}

// Rendering to two textures, not direct to screen
struct PixelShaderOutput
{
 float4 Normal : COLOR0;
 float4 Depth : COLOR1;
};

PixelShaderOutput PixelShaderFunction(VertexShaderOutput input)
{
 PixelShaderOutput output;

//camera / far plane
 //value between 0 and 1 for depth
 output.Depth = input.Depth.x / input.Depth.y;

//X, Y and Z components of normal
 // moved from (-1 to 1) range to (0 to 1) range
 output.Normal.xyz = (normalize(input.Normal).xyz / 2) + .5;

 output.Depth.a = 1;
 output.Normal.a = 1;

 return output;
}

technique Technique1
{
 pass Pass1
 {
  VertexShader = compile vs_4_0_level_9_3 VertexShaderFunction();
   PixelShader = compile ps_4_0_level_9_3 PixelShaderFunction();
 }
}


The depth and normal buffers are
passed to the lighting shader,
and the Renderer loops through the lights in the scene, calculating the
lighting for each visible geometry pixel. Each point light’s area of effect is
approximated by a sphere, which the shader uses in combination with the
geometry buffer to apply colour and lighting intensity to each pixel within its
influence.

With the scene’s lighting
information stored in a light map texture, the Renderer does a final pass of
the whole scene, combining the lighting with the scene geometry, and yielding a
finished lit scene. While more advanced renderers would use the lighting information
with material shaders to create materials with depth (using normal maps) and
variable glossiness/roughness, currently my final pass scene shader simply samples
the lighting from the lightmap and combines it with the textures applied to
each face:

Quick Tip: Shaders in MonoGame
When I started writing shaders
for my game, I was having difficulty compiling and using them with the content
pipeline. Here are the steps I followed to get shaders successfully working:
1.
Use the MonoGame Pipeline tool to manage and
compile your shaders rather than a ContentProject. If you are currently using a
MonoGame ContentProject, set the .fx files Compile action to “Do Not Compile”
and open the ContentProject with Pipeline.
2.
Create the shaders and compile them using
Pipeline, then open the output folder storing the shader .xnb files.
3.
Create a content folder in your game Project and
copy the shader .xnbs into an Effects folder.
4.
Now load the shaders into your code i.e.:
_ambient = ScreenManager.GetInstance().ContentManager.Load<Effect>(@"Effects/AmbientLight");
Game Development: 4.User Interface and HUD
In the design of my game engine,
I have split the game’s visualisation into two primary components: the 3D
renderer, and the HUD. Both inherit from my AbstractScreen class, allowing them
to handle input, update and draw. Since these two components are displayed
together in the game, both visualising elements of the game’s state, I have
wrapped them in a GameplayScreen class, also an AbstractScreen, which is added
to the ScreenManager’s screen stack when the game loads. The GameplayScreen also
holds and updates the GameState, which stores everything in the game world,
including the player, enemies, the current level etc. The GameplayScreen passes
the GameState to the renderer and HUD, which draw aspects of the current state,
with the HUD overlaid on the renderer output.


Using the HasFocus, IsActive and
IsVisible controls, the functionality of each component can be controlled
individually. For example, if the player wants to hide the HUD, its IsVisible
and HasFocus properties are set to false to stop it drawing and accepting
input, while IsActive is left as true to keep updating the HUD so that it is in
the correct state when it is made visible again. Additionally, setting these
properties for the GameplayScreen which contains the renderer and HUD components
allow the functionality of both to be controlled at the same time, such as
setting HasFocus and IsActive to false when the pause screen is added to the
ScreenManager, stopping the updating and input handling of both elements at
once, while continuing to draw both the game world and the HUD underneath the
transparent pause screen.
UI Elements
A game’s Heads-Up Display (HUD)
is primarily used to concisely display a portion of the data available in the
game’s state, such as the player’s health, equipped weapon and ammo, the mini-map.
Additionally, it may facilitate some of the gameplay features through interactive
elements, like an inventory and equipment display for a role-playing game, or
unit management in a strategy game. While some games render HUD elements within
the 3D render state, or display 3D elements within the HUD, I am currently
working under the assumption that all HUD elements are 2D and displayed over
the 3D render state.
The basic structure of a UI
element is very similar to that of a screen: it can handle input, update its
logic, and draw its visual components, the use of each controlled by the
HasFocus, IsActive and IsVisible properties, respectively. I’ve added an
additional Vector2 parentPosition input parameter to the UI Element’s Update
method, the use of which I discuss in the Coordinate System section below.
The main GameHUD screen stores a
linked list of type AbstractUIElement, into which any UIElement implementation
may be added. The GameHUD screen loops through all elements in the list in its
HandleInput, Update and Draw methods, checking the corresponding property (i.e.
HasFocus, IsActive, IsVisible), and calling the method on the element if the
property is true. The advantage of using a linked list for UI elements as
opposed to a regular list is that it relatively trivial to reorder elements.
This is especially important during the Draw call, in which elements are drawn
from back to front in the order they appear in the linked list. If a user selects
part of the HUD that is obscured by other UI elements, we can pull it from the linked
list and re-add it at the end, so that it will be drawn last, and therefore on
top of the other elements. Adding an OnClick event to the UIElement and tying
it to a MoveToFront event handler in the GameHUD screen allows us to call this
ordering functionality when the player clicks on a UI element:
        public void MoveToFront(UIElement element)
        {
            if(_UIElements.Contains(element))
            {
                _UIElements.Remove(element);
                _UIElements.AddLast(element);
            }
        }
The specific implementation of
each UI element will differ based on the information it is displaying or the
functionality it is providing. Generally, each element will display text and
images, so they will hold SpriteFonts and Texture2Ds. As most HUD elements are
communicating information or providing interaction with the game’s state, a
reference to the appropriate object in the game state is passed in the UI
element’s constructor. For example, a health bar HUD element will be passed the
player object, so that when it draws it uses the player object’s health
variable.
Element Hierarchy
Rather than storing all UI
elements in a flat structure directly in the HUD class, I’ve constructed a UI
hierarchy that allows elements to be grouped in containers. Basic
container-type UI components include grid and list views, which can be combined
with other UI elements to form more complex HUD components, such as a
grid-based player inventory or skill bar. Each container specifies the layout
and position of sub-components, managing them with a nested coordinate system.
Coordinate System
With a 2D HUD, we only need to
concern ourselves with X and Y coordinates, with the position values of all HUD
elements stored as Vector2s. Our main HUD screen has the full game window as
its canvas. In MonoGame, the (0, 0) start coordinate of the window is the
top-left corner of the window, while the final (Viewport.Width,
Viewport.Height) coordinate is its bottom-right corner.
Using a hierarchical approach to
storing UI elements, it is important to be able to position a component
relative to its parent. I store two positional values for every element:
_positionRelative, an element’s XY offset from its parent’s current position,
and _positionAbsolute, the actual screen position of the element. Following the
coordinate system of the MonoGame application’s viewport, _positionAbsolute is
the top-left corner of a UI element.
When a UI element is created, its
relative position is set and it is passed its parent’s current absolute
position, calculating its own position as follows:
_positionAbsolute = parentPosition+_positionRelative.
In the Update call for every UI
element, I pass in the latest parentPosition and perform the above calculation,
ensuring that the each element is always correctly positioned relative to its
parent. When drawing the element, all calls to the SpriteBatch will use the
screen position stored in _positionAbsolute.
UI elements also have Width and
Height properties, calculated based on the text/Texture2D/Bounding Box of the
component. Container UI
elements use these properties to position child components relative to each
other, for example setting the _positionRelative of the second element in a
grid row equal to the first element’s offset plus its Width.
Experiment: Floating HUD
I’d been playing Destiny as I was
implementing the HUD, and liked the way the UI elements float around the screen
as the cursor moves: as the cursor moves right, the UI floats left, as it moves
down, the UI moves up, and vice versa. As
a test of my HUD, I decided I’d try implementing the functionality in my code.

Thanks to my hierarchical UI and
relative-position based coordinate system, it turns out that this is a
relatively simple feature to get working. In order to move the whole UI, all we
need to do is change the _positionAbsolute value of the GameHUD screen. All UI
elements that it holds will have their position modified during the update call,
and down through the element hierarchy until all child UI elements’ positions
have been changed.
To implement this functionality,
the code was modified to calculate the change to apply to the HUD screen’s
_positionAbsolute based on the position of the mouse cursor during every update.
Firstly, I add an additional Vector2 _defaultPosition coordinate to the GameHUD
class, which stores the position of the HUD when the mouse is at its “default”
position (i.e. top-left corner, centre of screen, or bottom-right corner). In any
frame, the absolute position of the HUD is its default position plus some
factor of the mouse cursor’s deviation from its default position:
Vector2 mouseMoveOffset = new Vector2((- input.CurrentMouseState.X) / dampeningFactor, ( - input.CurrentMouseState.Y) / dampeningFactor);

_positionAbsolute = _defaultPosition + mouseMoveOffset;
The dampeningFactor controls the
ratio of mouse movement to HUD movement, while taking negative values of the
mouse coordinates moves the HUD in the opposite direction of the mouse
movement. This calculation is performed and the _positionAbsolute value passed to every UIElement
during every update, allowing the _positionAbsolute of every element in the UI
hierarchy to be updated before the Draw call.
Game Development: 3.Input Handling
Input Handling
Interaction in a game is created
by determining what buttons are pressed or released by the player, where the
cursor is positioned, and performing some action in response to the input. MonoGame provides an interface for reading
player input, being able to report the current state of the keyboard, mouse (and
gamepad). In a game environment, it may be important to have knowledge of the
previous input state, such as determining if a key is being held, or how far
the mouse has moved since the previous frame. I created an InputState class to
capture this information, setting the previous mouse and keyboard state at the
start of each update, then capturing the current player input:
        public void Update(bool isMouseVisible)
        {
            //Only handles input if the application is currently the active application
            if (ScreenManager.GetInstance().Game.IsActive)
            {
                //Record the states of the keyboard and mouse from the previous update
                previousKeyboardState = currentKeyboardState;
                previousMouseState = currentMouseState;

                //Get the current state of the keyboard and mouse
                currentKeyboardState = Keyboard.GetState();
                currentMouseState = Mouse.GetState();

                this.isMouseVisible = isMouseVisible;
            }
        }
For menu screens, the
ScreenManager passes this InputState to each screen, which uses it to determine
if the cursor is over a menu element, by checking if the mouse’s position
overlaps the element’s detection box, or if the menu element has been clicked
by checking if the left mouse button has been pressed while overlapping the
detection box, i.e.:
   //Button Clicked
if(((input.CurrentMouseState.LeftButton == ButtonState.Pressed && input.PreviousMouseState.LeftButton == ButtonState.Released)&& detectionBox.Contains(new Point(input.CurrentMouseState.X, input.CurrentMouseState.Y))))
If this proves to be true, the
button’s OnClick event is fired, providing the primary interaction with the
game’s menus.
Game World Control State
For interaction within the game
environment itself, I have been building a GameWorldControlState class which is
passed the InputState during every engine update, and maps inputs to actions in
the game world. The control state defines an enumeration of all the actions the
player can take in the game world, such as selecting an ability, interacting
with an object, or attacking an enemy. These values are mapped to an input,
with a trigger specifying if the action should happen when the input is pressed
or released:
        public enum Actions
        {
            SelectAbilityOne,
            SelectAbilityTwo,
            SelectAbilityThree,
            SelectAbilityFour,
            SelectAbilityFive,
            SelectAbilitySix,
            SelectAbilitySeven,
            SelectAbilityEight,
            SelectAbilityNine,
            SelectAbilityTen,
            PrimaryHandClickAbility,
            SecondaryHandClickAbility,
            ToggleShaders
     //...
        }
        public enum Trigger
        {
            Pressed,
            Released
        }

        public struct ActionMapping
        {
            public Actions action;

            //Keyboard/mouse etc.
            public InputType inputType;
            public Trigger trigger;

            //Use if keyboard input
            public Keys keyboardKey;
            //Use if mouse input
            public MouseButton mouseButton;
        }

        protected List<ActionMapping> actionMappings = new List<ActionMapping>();

        public bool ActionMappingTriggered(ActionMapping actionMapping, InputState inputState)
        {
            bool result = false;

            if (actionMapping.trigger == Trigger.Pressed)
            {
                if (actionMapping.inputType == InputType.Keyboard)
                {
                    if (inputState.CurrentKeyboardState.IsKeyDown(actionMapping.keyboardKey) && inputState.PreviousKeyboardState.IsKeyUp(actionMapping.keyboardKey))
                    {
                        result = true;
                    }

                }
                //...
            }
            //...

            return result
        }
When the control state is passed
the InputState, it checks the state of each of these action mappings, and marks
the action for activation if the trigger terms are true. Once all the actions
to trigger have been determined, the control state fires the corresponding
event for each action. As the GameWorldControlState class is a singleton, it is
globally accessible, enabling any object in the game world to obtain a
reference to any of its events, tie an event handler to them, and perform some
action when the event is triggered in the control state, i.e.:
//In the player class, tie the event handler for performing the primary hand’s active ability to the corresponding action event in the control state
GameWorldControlState.GetInstance().PrimaryHandAbilityOnClickEvent += _primaryHandSlot.ActiveAbilityOnClick;
Mouse Ray Casting
For determining if the player has
clicked on an object in the game world, I have written a raycasting function
that converts the mouse’s screen space coordinates to world space and builds a
Ray using the active camera’s projection and view matrices:
        public Ray? GetMouseRay(Camera activeCamera)
        {
            Ray? ray = null;
            if (activeCamera!= null)
            {
                //Get the mouse's screen position
                Vector2 mousePoint = new Vector2(CurrentMouseState.X, CurrentMouseState.Y);

                Vector3 nearSource = new Vector3((float)mousePoint.X, (float)mousePoint.Y, 0f);
                Vector3 farSource = new Vector3((float)mousePoint.X, (float)mousePoint.Y, 1f);
                //Unproject the screen position to world space using the active camera
                Vector3 nearPoint = ScreenManager.GetInstance().GraphicsDevice.Viewport.Unproject(nearSource, activeCamera.CameraProjectionMatrix, activeCamera.CameraViewMatrix, Matrix.Identity);
                Vector3 farPoint = ScreenManager.GetInstance().GraphicsDevice.Viewport.Unproject(farSource, activeCamera.CameraProjectionMatrix, activeCamera.CameraViewMatrix, Matrix.Identity);

                // Create a ray from the near clip plane to the far clip plane.
                Vector3 direction = farPoint - nearPoint;
                direction.Normalize();

                // Create a ray.
                 ray = new Ray(nearPoint, direction);
            }

            return ray;
        }
Testing the objects for collision
with this ray allows us to determine which objects lie under the mouse cursor,
and by comparing the collision points along the ray, we can discover which of
these objects is nearest to the screen. Efficiently partitioning the objects in
your scene to reduce the search space for raycast tests is a topic I won’t
cover in this post, save for briefly mentioning that I have implemented a
voxel-based traversal algorithm, the original source of which can be found here:
(http://www.cse.yorku.ca/~amana/research/grid.pdf).
Game Development: 2.Screen Management
When starting a new project in
MonoGame, it can be tempting to jump into the default Game class and start
loading content, getting objects to update, and displaying the results
onscreen. This is a great way to start experimenting and seeing results
quickly. However, if you plan on building out your game, you’re going to need
to put some foundations in place to manage the access of the different portions
of it.
Having some experience with the basics
of loading, updating and drawing objects from XNA, I started my game
development learning in MonoGame by looking at screen management. Games tend to
have numerous screens: a welcome screen, the main menu, options screens, loading
screens, gameplay screens. Separating the game into screens allows us to
isolate the different components of the software. Using a Screen Manager, we
keep track of the states of the screens currently in use by the game, and load
and unload screens as the player transitions through the different parts of the
game.
My ScreenManager class is a
singleton that inherits from DrawableGameComponent. It
is instantiated in the Game.cs constructor and registered with the game:
screenManager
= ScreenManager.CreateScreenManager(this);
Components.Add(screenManager);
Registering the component means
that its inherited Initialize, Load, Update and Draw methods will be called as
appropriate by the game. The ScreenManager holds a reference to the graphics
device, and a list of all screens currently in use by the game. AddScreen and
RemoveScreen methods provide the functionality for loading screens in and out
of the game’s state. As a singleton, the ScreenManager contains a static
GetInstance method, allowing a reference to the ScreenManager to be globally
accessible:
private static ScreenManager screenManager = null;

public static ScreenManager CreateScreenManager(Game game)
{
  if(screenManager==null)
  {
   screenManager=new ScreenManager(game);
  }
  return screenManager;
}

public static ScreenManager GetInstance()
{
  return screenManager;
}
All screens in the game inherit
from the AbstractScreen abstract class, containing HasFocus, IsActive and
IsVisible Boolean properties, which the ScreenManager uses to determine whether
to call the screen’s HandleInput, Update and Draw methods respectively:
        public override void Update(GameTime gameTime)
        {
            //...
            foreach (AbstractScreen screen in screens)
            {
                if (screen.HasFocus)
                {
                    screen.HandleInput(gameTime, input);
                }

                if (screen.IsActive)
                {
                    screen.Update(gameTime);
                }
            }
        }
        //...
        public override void Draw(GameTime gameTime)
        {
            //...
            foreach (AbstractScreen screen in screens)
            {
                if (screen.IsVisible)
                {
                    screen.Draw(spriteBatch);
                }
            }
        }
For menu screens, I created Text
and Button UI elements, which use Rectangle objects to detect mouse over, mouse
exit and click interactions. These elements include functionality to fade in
and out when transitioning screens, can be highlighted when they have focus,
and fire custom OnClick events when pressed. Each element’s OnClick event can
be tied to an event handler in the owning screen, and used to request the ScreenManager
to transition screens:
//In main menu screen constructor
        playGameButton.OnClickEvent += NewGame;
            //...
        //New game event handler
        public void NewGame(MenuElement element)
        {
            OnTransitionOut();
            ScreenManager.GetInstance().Game.IsMouseVisible = true;

            //Remove all screens (i.e. this screen)
            ScreenManager.GetInstance().Screens.Clear();

            //Add a loading screen
            ScreenManager.GetInstance().addScreen(new LoadingScreen());

            /*Add the Game screen which performs content loading in a separate thread,
            allowing the loading screen to update as the game loads*/
            ScreenManager.GetInstance().addScreen(new GameScreen(false));

        }
I created a number of screens
that inherit from AbstractScreen, instantiate lists of buttons and tie their
OnClick events to event handlers. In these screen classes, the HandleInput
method directs input to the buttons in the list, and the Draw method loops
through the list and draws each button. By adding the main menu screen to the
ScreenManager when the game starts, and using its event handlers to transition
to other screens, I’ve built a basic menu structure for a game:

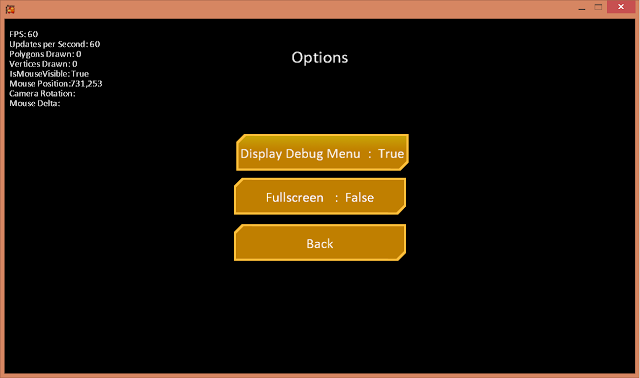


When the player starts playing
the game from the menu (i.e. clicking New Game), a gameplay screen is created
and added to the ScreenManager’s list of active screens, along with a Loading
Screen. The gameplay screen performs content loading in a separate thread, and
requests the ScreenManager to remove the Loading Screen upon completion. The
gameplay screen acts as the root for all the components of the game itself,
including the game’s content, state, and the renderer, which I will look at in a later post.
Game Development: 1.Background and Introduction
Background
I am a software engineer currently specializing in
Microsoft technologies, particularly C#, ASP .Net MVC, and Team Foundation
Server development. I have an undergraduate and Master’s degree in Computer
Science, with a foundation
in Java, algorithms, software architecture and design, nets and comms, real-time systems. I have
always worked to extend my core Software Engineering, Algorithmic and
development skillset beyond what I have used in university or work, particularly
within the realm of digital media, learning new skills and seeking ways to
apply my knowledge within the domain. Aside from 3D modelling in Blender over
the years, I have taught introductory courses and lectured in 3D graphics to Computer Science
students.
I have a strong background in complex system
simulation, particularly systems dynamics, agent-based modelling and artificial
intelligence, and the possibilities of the systems that can be simulated and
the application of such simulations has always intrigued me. Through my
undergraduate thesis and Master’s work I have sought to combine my knowledge
and learning in complex systems with my interest in digital media, particularly video
games, exploring the application of complex systems simulations within video
game environments.
Undergraduate Work
For my final year thesis, I developed an urban
dynamics simulation engine, which could take a collection of defined urban
systems, such as population, food production and consumption, and economy, and
simulate their interactions over time to represent the development of an urban
area.

| Population Model |
I primarily develop in C#, so
once I had created the simulation engine, I decided to add a graphical
front-end and game-like interactions using the XNA Game Framework. With XNA, I
was able to aggregate the data being returned from my engine and represent the
state of the urban system in a game world, which consisted of 3D models of
buildings laid out on a 2D grid. For example, a population system in the engine
contained population separated into low, medium and high density housing. This
system was represented graphically as a section on the grid containing small
houses, terraced houses and apartment blocks corresponding to the population in
each category. For user interaction, I added a 2D GUI which allowed players to
make decisions that would add additional systems and open flows in the
simulation. If the residents were going hungry and the player had amassed
enough money, they could zone a new farming area, which would add a new food
production system to the simulation and hopefully support the population’s
needs over time, for example.

Masters
After finishing my undergraduate
degree, I went on to do a Masters in Computer Science, specialising in multi-agent
systems and reinforcement learning. Whereas my undergraduate complex systems
studies focused on aggregate
approaches, my Masters explored the simulation of individual agents and their
interactions to drive a complex system. I sought to use complex system
simulation to drive a town of Non-Player Characters in a game environment. I
used Reinforcement Learning artificial intelligence techniques to create
goal-driven NPCs that learned actions over time. Each agent was assigned a
resource it sought to gather, and had to learn how to attain the resource,
either by producing it themselves, working with others that were skilled at
producing the resource, or trading the resources they produced for the one they
wanted. I proposed a Social Graph structure to capture the relationships
between the NPCs, allowing agents to make decisions based on their
relationships with others, and affecting these relationships based on the
outcome of interactions.

As with my undergraduate work, I built
the simulation engine in C# with XNA. I created a simple visualisation to aid
in understanding the processes of the simulation (in the above image, the large
squares represent buildings, the small squares are their entrances, and the
blue spheres are the agents). The simulation ran in real-time, with agents
making decisions and learning from the outcomes. In order to allow the agents
explore their environment, I used a graph-based implementation of the A*
pathfinding algorithm. As the environment was being initialised, the engine
would place pathfinding nodes in open space at the corners of each building.
These nodes were connected into a pathfind graph, and a pruning phase was run
to remove any nodes that did not contain unique information. When an agent
wanted to navigate somewhere, it would find the nearest reachable pathfind
node, and use A* to discover the best path to the node nearest its destination.
Additionally, I used a Sweep
and Prune system for collision detection. In this approach, all collision
objects were sorted along a single axis by the minimum coordinates of their
bounding box. Going through the ordered list, objects that did not overlap on
the axis could be trivially identified by comparing their minimum and maximum
coordinates. These objects could be dropped or “pruned” from the list, while
objects that did overlap on the list went through a further phase of testing
for collisions.

| Pathfind Graph (Buildings in green, graph in orange) |
Post-University
While I am now working on enterprise software development
with Microsoft technologies in my day job, I continue to develop my skills in
digital media and game development in my spare time. I have taken a break from complex
system simulation, and have been learning the more core aspects of game programming:
interaction and game mechanics, graphics and rendering, game environment creation. I’ve continued
working in C#, but as XNA is no longer supported, I’ve moved to MonoGame, and
open-source port of the XNA Framework. Many of the features are identical
between the two, so there is a lot of transferrable knowledge, but certain
functionality behaves differently, particularly with content management and
rendering, as MonoGame offers cross-platform support. I have been working in
Visual Studio Express 2013 and back everything up to my source control
repository on BitBucket using the Git integration in Team Explorer with Visual
Studio.
I have been applying what I have
been learning to create a game engine, including menu systems and screen
management, input handling, UI layout, inventory systems, game state management
and scene decomposition, 3D geometry creation and rendering. In following
posts, I’ll look at how I have gone about implementing some of these
components.
Subscribe to:
Posts
(
Atom
)